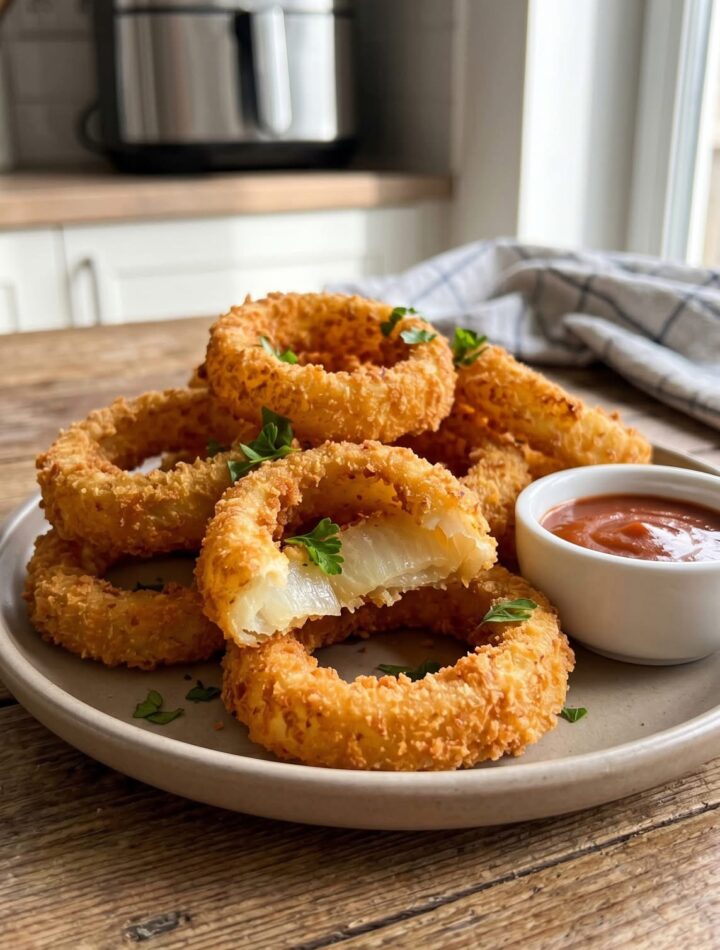
Crispy Onion Rings stand as one of the most iconic, timeless, and universally beloved appetizers, celebrated across countless cultures and appreciated by food enthusiasts everywhere. The immense popularity of this dish stems from its remarkable contrast of textures—featuring a deeply satisfying, ultra-crunchy exterior shell paired harmoniously with a tender, naturally sweet, and soft interior vegetable layer. A beautifully arranged platter of these freshly air-fried, golden-brown crispy onion rings serves as the magnificent centerpiece for casual weekend gatherings, lively game night celebrations, relaxed family dinners, festive holiday buffets, comforting midnight snacks, or quite simply whenever an exceptionally flavorful and satisfying savory snack is desired.
Unlike mass-produced, pre-packaged commercial frozen options often found in grocery store freezers, crafting your own crispy onion rings at home grants the cook absolute autonomy and meticulous control over every single component of the dish. This includes selecting the sweetest raw onions, adjusting the precision of the flour seasoning blend, customizing the thickness of the coating, and monitoring the exact level of crispiness achieved in the convection basket. The inherent richness and robust flavor profile of well-seasoned batter eliminate the necessity for masking the food in complex side dishes, allowing the true craftsmanship of the seasoning to take center stage. This remarkably thorough, highly comprehensive guide walks you through every individual stage of the preparation process in extensive detail, from selecting the finest produce at the market to achieving the ultimate golden presentation on the serving table.
Introduction
crispy Onion rings belong to a distinguished global tradition of battered, breaded, and fried appetizers designed to maximize surface area crispiness while locking in maximum internal moisture. While sweet onions are often utilized raw in salads, slicing them into uniform thick rounds and coating them in a sturdy seasoning dust allows high-heat cooking methods to caramelize their natural sugars beautifully. The advent of air fryer technology has completely revolutionized home preparation of this classic food, allowing for a fantastic, traditional ‘fried’ crystalline texture without requiring vast quantities of oil. This technique uses high-speed hot air circulation to crisp the outer layers swiftly at the exact same moment the interior onion reaches its peak tenderness, creating an unparalleled dining experience.
Preparing these ultimate Crispy Onion Rings requires only a small selection of readily available pantry staples, standard kitchen implements, and a straightforward chronological workflow. Even individuals who are completely new to home cooking or to air fryer technology can confidently master this recipe and execute it with flawless success by following the comprehensive structural breakdown provided below.
Yield
This extensive recipe is formulated to produce approximately ten to twelve large, restaurant-quality individual servings of crispy onion rings, making it ideal for hosting gatherings, meal preparation, or large family feasts.
Preparation Time
- Active Preparation Time: 30 minutes
- Chilling & Rest Time: 30 minutes
- Air Frying Time: 10-12 minutes per batch
- Total Elapsed Time: Approximately 1 hour 15 minutes
Main Ingredients
- 4 large fresh sweet onions (such as Vidalia or Walla Walla)
- 4 cups all-purpose flour (sifted)
- 1 cup cornstarch (blended into the flour for enhanced structural crispiness)
- 4 large farm-fresh eggs
- 2 cups cold milk or buttermilk (essential for binding the batter structure)
- 6 cups fine panko breadcrumbs
- 3 tablespoons premium garlic powder
- 3 tablespoons onion powder
- 2 tablespoons smoked Hungarian paprika
- 2 teaspoons freshly cracked black pepper
- 1 bunch fresh Italian flat-leaf parsley (finely minced for presentation)
- Cooking oil spray (avocado oil or olive oil for high smoke point misting)
Additional Optional Ingredients
- 1 cup grated aged Parmesan cheese (mixed with the panko for a savory crust upgrade)
- 2 tablespoons dried oregano leaves
- 2 tablespoons dried thyme leaves
- 1 teaspoon cayenne pepper (for an assertive heat profile)
- 1 teaspoon ground white pepper
- Garlic salt
- Onion salt
- 1 cup crushed golden potato chips
- Celery salt
- Finely chopped fresh chives
- A side of zesty dipping sauce or ranch
Equipment Required
- Large air fryer (convection oven style or basket style)
- Extra-large heavy-duty wooden cutting board
- Professional-grade sharp chef’s knife
- Three extra-large shallow wide-bottomed ceramic bowls (for the dredging line)
- Stainless steel kitchen tongs or dipping forks
- Precision measuring cups
- Precision measuring spoons
- Large baking sheets lined with parchment paper
- Absorbent heavy kitchen paper towels
- Elegant presentation serving platters or baskets
Choosing the Perfect Onions
The foundational quality of your raw produce exerts a direct. Unyielding influence on the final texture and flavor of the crispy onion rings. Selecting the absolute finest vegetables from your market is an essential first step.
High-quality raw onions should feel notably heavy, firm, and solid when lifted. Indicating a high water content and fresh internal layers. The outer papery skin must be completely dry, tight, brittle, and smooth across the entire surface. The neck of the onion should be tightly closed and free of any soft spots, green sprouts, or dampness.
Look for a broad, flat shape which is characteristic of traditional sweet onions. This structure yields larger, more uniform rounds when sliced crosswise, which is ideal for creating impressive. Sturdy loops that hold coatings exceptionally well.
Avoid purchasing onions that exhibit a soft or mushy structural consistency, dark mold patches beneath the skin. Unusual bruising, a sour aroma, or flexible, rubbery layers.
Cleaning and Prepping the Onions
Proper handling and setup ensure a smooth workflow and the cleanest flavor profile for your final dish.
- Thoroughly sanitize your hands, the cutting board surface, the chef’s knife, and all surrounding countertops before introducing the produce.
- Peel away the dry, papery outer skin and the first tough layer of each onion, discarding them carefully.
- Crucial Step for Coating Adherence: Do not wash the peeled onions under running water. As this creates a slippery outer film. If any dirt is present, meticulously wipe the surface clean using a dry paper towel. Keeping the exterior dry is paramount to ensuring the initial flour dust forms a permanent bond with the onion muscle.
Cutting and Shaping the Onion Rings
- Secure the peeled onion flatly against the center of your cutting board.
- Using your sharp chef’s knife. Trim a very thin slice off the root end and the top stem end to create stable flat surfaces.
- Slice across the onion horizontally into thick, uniform rounds approximately one-half to three-quarters of an inch in width. Maintaining a generous thickness guarantees the onion retains its juicy sweetness and structure during the high-heat cooking process.
- Gently use your fingers to separate the concentric rounds into individual loops, grouping them by size. Save the very small center cores for other culinary uses.
Establishing the Breading Station
Creating a systematic, organized workflow is paramount to achieving a perfect. Restaurant-quality crust that adheres tightly to the slick surface of the onion.
- Arrange your three large, shallow bowls in a strict horizontal sequence from left to right next to your air fryer.
- Bowl One (The Seasoned Base): Combine the sifted all-purpose flour, cornstarch, garlic powder, onion powder, smoked paprika, and black pepper, mixing thoroughly with a whisk.
- Bowl Two (The Wet Liquid): Whisk the farm-fresh eggs thoroughly alongside the cold milk or buttermilk until a completely smooth, uniform fluid liquid is achieved.
- Bowl Three (The Crystalline Crunch): Combine the crisp panko breadcrumbs and finely minced fresh parsley, mixing well to ensure the green flakes are distributed evenly.
The Triple-Dredging Technique
- Take an individual onion loop and drop it into Bowl One, using your right hand to scoop flour over it until it is thoroughly blanketed, ensuring the inside and outside walls are completely dry.
- Lift the loop, shake off all loose powder, and submerge it entirely into Bowl Two, ensuring no dry spots remain visible.
- Transfer the wet loop immediately into Bowl Three, burying it completely under the panko breadcrumbs. Use your fingers to press down firmly, locking the crumbs into the egg wash to create a dense, complete seal with no gaps.
- Place the fully coated onion ring onto a baking sheet lined with clean parchment paper, and repeat the process for all remaining pieces.
Chilling the Coated Rings
Allowing the breaded vegetable loops to rest before introduction to heat is a crucial step that prevents the coating from sloughing off in the basket.
- Place the entire tray of fully breaded onion rings into the refrigerator or freezer for approximately thirty minutes.
- During this cooling period, the moisture from the liquid wash hydrates the starches, causing the coating to contract, solidify, and form a permanent, sturdy shell that stays intact during air frying.
Preheating and Loading the Air Fryer
Getting the air fryer to the correct starting temperature is vital for immediate crisping of the exterior.
- Preheat your air fryer to 375°F (190°C).
- Arrange the chilled onion rings in the air fryer basket in a strict single layer. It is imperative not to overcrowd the basket or overlap the rings; significant space must remain between each piece to allow the high-speed hot air to circulate freely around the entire surface area. This ensures uniform browning and maximum crystalline crunch. Cook in batches.
The Air Frying Method
- Slide the loaded basket into the preheated air fryer and cook at 375°F (190°C) for a duration of 10 to 12 minutes.
- Crucial Step for Even Browning: Lightly mist the top of the onion rings with your cooking oil spray right before closing the basket. This fine mist activates the starches, accelerating the development of a beautiful golden color.
- Approximately halfway through the cooking process (around the 5 to 6-minute mark), pause the air fryer, use kitchen tongs to carefully flip each onion ring individually, and apply another light mist of cooking oil spray to the reverse side.
- Continue cooking until the exterior displays a magnificent, uniform deep golden-brown coloration and feels exceptionally firm and crispy to the touch. Remove from the basket immediately using tongs.
Alternative Oven Baking Method
For those prepping massive quantities simultaneously, this recipe adapts beautifully to standard convection oven baking.
- Preheat your oven to 425°F (218°C), arrange the breaded loops on a wire cooling rack set inside a large baking sheet, spray both sides generously with a light mist of cooking oil, and bake for fifteen to eighteen minutes, flipping halfway through until completely golden.
Traditional Serving Methods
- Line a rustic woven serving basket with greaseproof checkered wax paper, pile the steaming hot onion rings high in a mountain-like formation, and garnish generously with additional freshly chopped parsley. Serve immediately alongside an elegant ramekin filled with a smooth, rich dipping sauce.
Elegant Party Presentation
- Arrange the golden rings on a large white porcelain platter, stacking them neatly in overlapping concentric circles. Place a decorative ceramic container of savory sauce in the exact center of the display. Garnish the perimeter of the platter with fresh whole herb sprigs and a light artistic dusting of paprika for sophistication.
Dynamic Flavor Variations
- Garlic Parmesan Explosion Rings: Blend a cup of finely grated aged Parmesan cheese directly into the panko breadcrumbs bowl before coating the onion loops.
- Spicy Garlic Chili Rings: Incorporate a teaspoon of cayenne pepper and crushed red pepper flakes into the flour seasoning mixture for an assertive heat profile.
- Herbal Garden Crisp Rings: Use an abundance of dried thyme, oregano, and rubbed sage finely mixed into the dry base for a pleasant herbal aroma.
- Smoky Southern Barbecue Rings: Toss the finished, hot onion rings gently in a dry seasoning blend of smoked paprika, garlic powder, and brown sugar.
- Everything Bagel Crunch Rings: Replace half of the panko breadcrumbs with traditional “Everything Bagel” seasoning (comprising sesame seeds, poppy seeds, minced garlic, and onion).
- Zesty Citrus Blast Rings: Add a teaspoon of fresh lemon zest directly into the egg wash mixture to introduce a bright contrast that cuts through the savory coating.
- Loaded Bacon Fusion Rings: Roll the wet onion loops in exceptionally fine bacon bits before applying the final panko coating layer for a deeper savory profile.
- Golden Ginger Umami Rings: Introduce gentle warmth and complexity by adding half a teaspoon of dry ginger powder and white pepper to the flour mixture.
- Crisp Cucumber Herb Accompaniment: Serve the hot, rich onion rings alongside an incredibly cooling side salad composed of thinly sliced English cucumbers and fresh garden herbs.
- Savory Sweet Honey Glazed Rings: Drizzle the finished crispy onion rings lightly with a warm glaze created from pure clover honey and a touch of melted butter.
Nutritional Information
Freshly prepared homemade onion rings naturally provide a rich source of:
- Vitamin C and Vitamin B6 (from the fresh onions)
- Dietary fiber
- Potassium and Manganese
- Essential amino acids (from the egg binder)
- Antioxidants
- Dietary energy (derived from the flour and healthy cooking oil mist)
The exact micro and macronutrient distribution varies depending on the specific onion size and flour brands selected.
Common Culinary Mistakes
- Overcrowding or overlapping multiple onion rings in the air fryer basket, which blocks air circulation and results in a soggy crust.
- Washing the onions under running water right before breading, which prevents the flour from sticking and causes the coating to slide off.
- Slicing the onions too thin, causing them to completely dissolve and turn mushy during the high-heat process.
- Skipping the mandatory chilling period after breading, which results in the panko crust separating in the hot air basket.
- Failing to apply a light mist of cooking oil spray, which causes the panko breadcrumbs to look dry and chalky instead of deep golden.
- Utilizing low-heat settings on the air fryer, which transforms the onion into a limp texture without building a crunch.
- Using raw onions that have developed green internal sprouts, which imparts a bitter flavor to the core.
- Leaving the cooked onion rings in the hot basket after the timer ends, causing them to trap steam and soften.
- Preparing the entire dish far in advance and letting them sit at room temperature for hours before serving.
Storage Guidelines
- Allow any leftover onion rings to cool completely to room temperature on a wire rack for approximately twenty minutes.
- Transfer the cooled rings into a clean, heavy-duty, airtight storage container, separating layers with parchment paper to maintain structural integrity.
- Store the container securely in the refrigerator and consume the contents within forty-eight hours to ensure optimum quality.
- To restore the signature crunch, reheat the rings in a preheated air fryer at 350°F (177°C) for two to three minutes; avoid utilizing a microwave, as this softens the shell permanently.
Freezing Instructions
- Uncooked, fully breaded onion rings can be frozen smoothly for future convenience.
- Arrange the breaded, raw loops in a single layer on a baking sheet and freeze for two hours until completely solid, then transfer into heavy-duty zipper bags.
- Store in the freezer for up to three months, and air fry directly from a frozen state at 375°F (190°C) for twelve to fourteen minutes, adding a light oil mist at the start.
Creative Uses for Leftover Rings
- Chop the leftover crispy rings and utilize them as a premium topping for hot bowls of chili or soup.
- Layer the rings inside game-day sliders or burgers for an exceptional crunchy texture.
- Crush the leftovers into a savory breakfast scramble or omelet structure.
- Chop into small pieces and incorporate into loaded baked potato toppings.
- Use as a crunchy layer inside fresh garden wraps or lunchbox sandwiches.
- Incorporate into a savory potato casserole bake or green bean casserole.
- Chop finely and mix into a savory flatbread pizza topping.
Party Serving Suggestions
- Prepare the extensive batch of onion rings entirely through the breading stage ahead of time, keeping them safely chilled on trays until guests arrive.
- Execute the air frying process in continuous small batches throughout the duration of the gathering to ensure every guest receives a piping hot, perfectly crispy serving.
- Establish a visually stunning, self-service dipping station featuring a diverse array of ramekins filled with different sauce options (BBQ, Ranch, Honey Mustard, Garlic Aioli).
- Provide small, individualized serving boats or baskets to allow guests to easily carry their onion rings while socializing.
- Balance the inherent richness of the savory dish by placing refreshing platters of fresh vegetable sticks nearby.
- Utilize uniquely themed decorative toothpicks or mini silver tongs to ensure a highly hygienic and sophisticated dining environment.


